
System Overview
The TAMS device operates on a Client-Server Polling Architecture. It acts like a browser: periodically connecting to your server to ask "Do you have any commands for me?" and to upload attendance data.
The Golden Rule: Your server must expose 4 specific URLs (Endpoints) that the device can visit. The Base URL must end with a forward slash (/).
Device Startup & Operational Modes
Pressed?"} FWCheck -- Yes --> OTA[Emergency OTA Update] --> Restart([Restart]) FWCheck -- No --> BTCheck{"KEY4 Pressed
OR RFID?"} BTCheck -- Yes --> BTConfig[BT Config Mode
Set WiFi/URL] BTCheck -- No --> ModeCheck{"Device Mode?"} ModeCheck -- "BT Mode" --> BTOp[BT Companion Mode
Connect to Mobile App] BTOp -- "Scan" --> App[App handles Upload] ModeCheck -- "WiFi Mode" --> WiFi[Connect WiFi & Sync RTC] WiFi --> Sync[Auto-Upload Offline Data] Sync --> Recovery[Check Crash Recovery] Recovery --> StartupCheck{"Startup Mode
Setting 'O'"} StartupCheck -- "1 (Command)" --> CmdMode["Command Mode
(Polls /command)"] CmdMode -- "Task Pending" --> Exec[Execute Task] --> CmdMode StartupCheck -- "0 (Attendance)" --> LiveCheck{"isLive
Setting 'L'"} LiveCheck -- "1 (True)" --> Live[Live Mode] Live -- "Scan" --> UploadLive[Instant Upload
or Offline Save] LiveCheck -- "0 (False)" --> Lecture[Lecture Mode] Lecture -- "Teacher Scan" --> Session[Session Active
Prevent Duplicates] Session -- "Teacher Scan" --> BatchUpload[Batch Upload
or Offline Save]
Device Workflow Diagram
Authentication
Every request from the device includes a custom security header. You must validate this key on your server.
Header Name
X-Api-Key
Example Value
SECRET_KEY_123
App Setup
Initial setup is done via the TAMS Config App (Android) using Bluetooth.
Connect
Open the app, accept permissions, and tap the Bluetooth icon to find your device.
Network
Enter SSID & Password.
Note: * and # are prohibited.
Server
Enter the Base URL (e.g., http://erp.university.com/api/v1/) and your API Key.
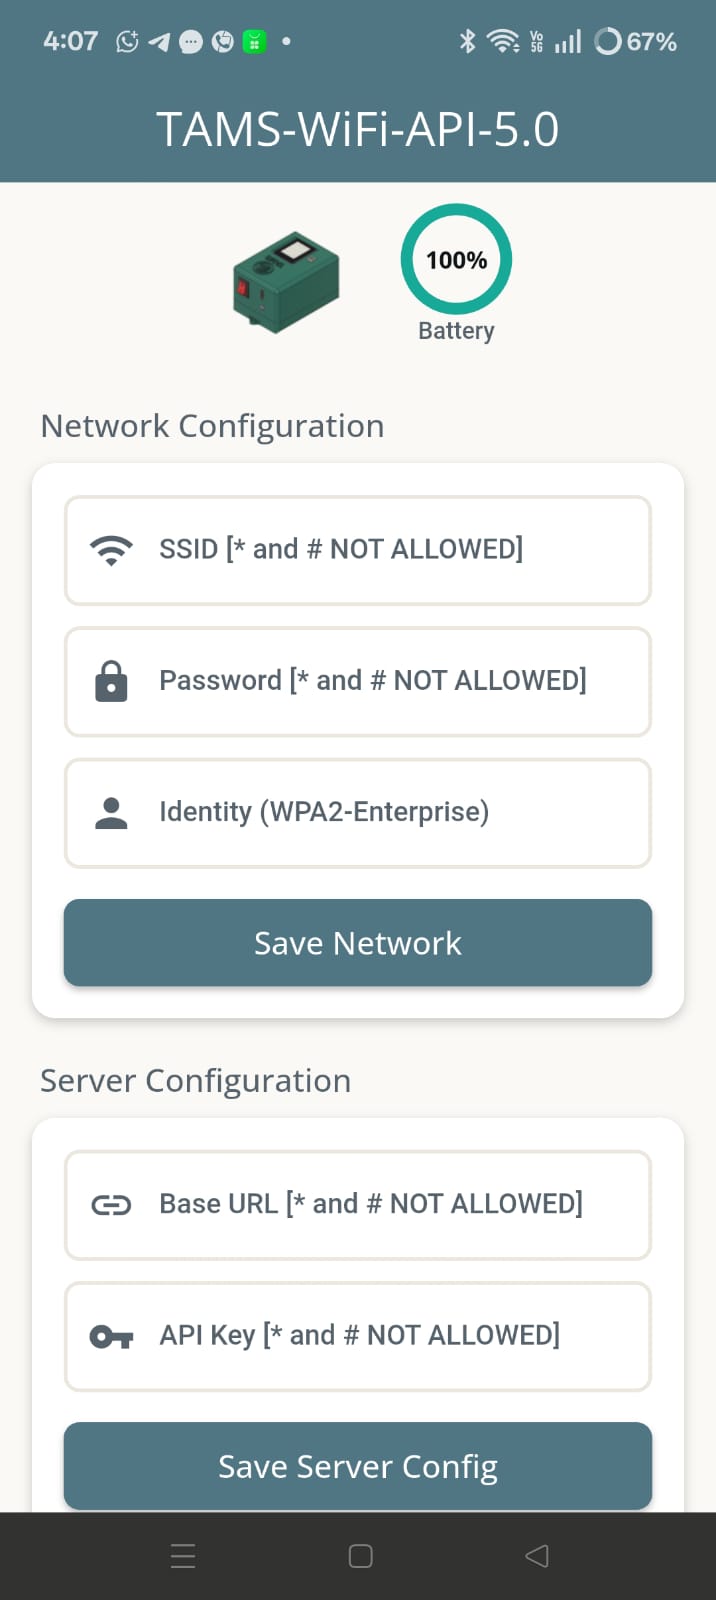
Home Screen 1/2
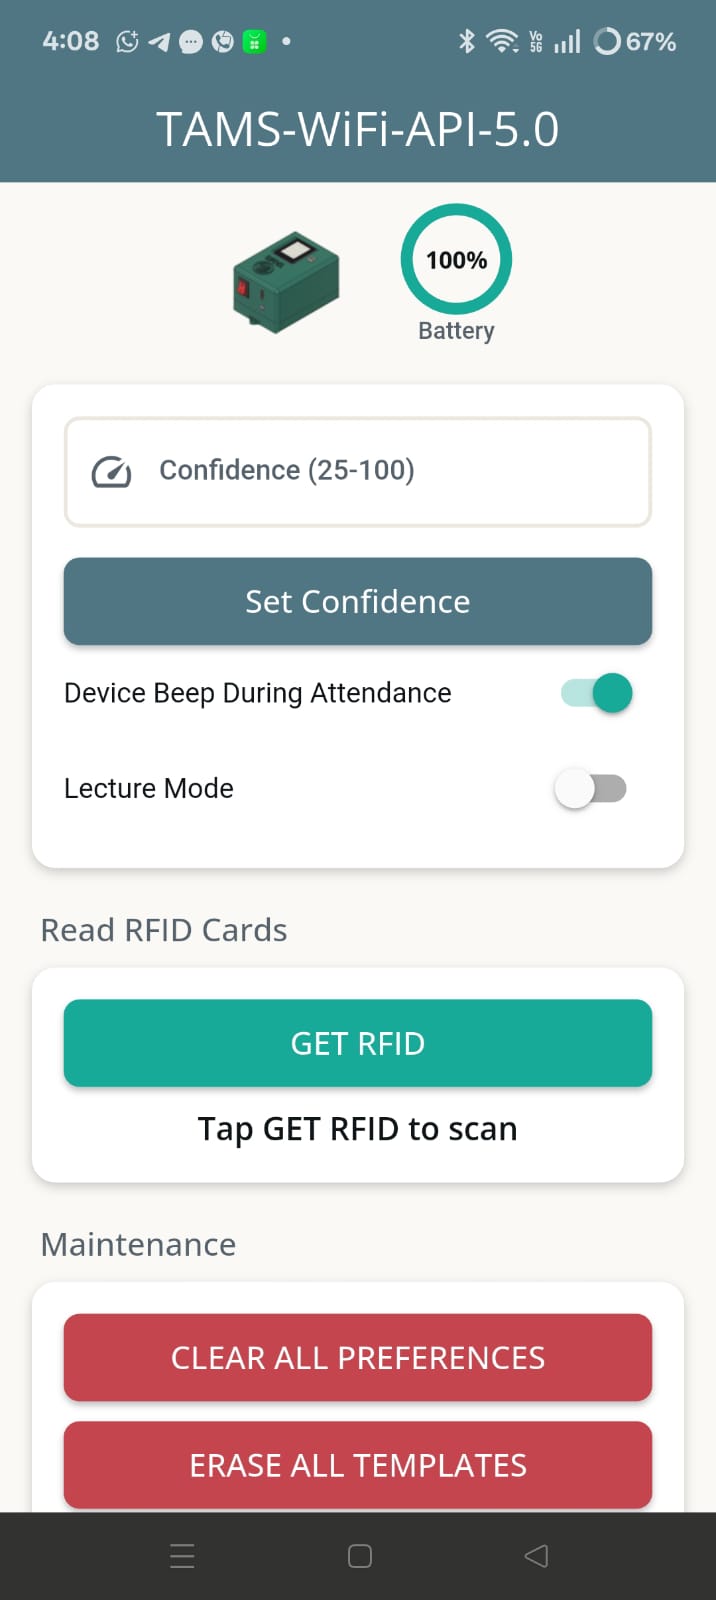
Home Screen 2/2
API Resources Summary
The ERP system must expose the following 4 Resources (Endpoints). These are appended to your Base URL.
| Method | Resource | Description |
|---|---|---|
| GET | /command | Polling: Device checks for pending tasks (e.g., "Enroll User"). |
| POST | /acknowledge | Reporting: Device reports command results (Success/Fail) and returns data. |
| POST | /attendance | Data Upload: Device uploads student attendance records. |
| GET | /sync | Batch Download: Device downloads fingerprint templates in bulk. |
Polling (Heartbeat)
GET /commandThe device calls this URL every 10-15 seconds to check for pending tasks.
{
  "status": "pending",        // Must be "pending" to trigger action
  "mac": "AA:BB:CC:DD:EE:FF", // Target Device MAC
  "command": "C",             // Command Code (e.g., C=Connect)
  "parameter": "0",           // Optional Parameter (e.g., "101" for ID)
  "cid": "unique_id_123"      // Unique Tracking ID for this command
}| Field | Type | Description |
|---|---|---|
| status | String | "pending" if work exists, "none" if idle. |
| command | Char | Single character code (see Command Reference). |
| parameter | String | Additional data (e.g., Student ID to delete). |
| cid | String | Unique ID to track command completion in /acknowledge. |
Acknowledge
POST /acknowledgeThe device calls this to report success/failure. Critical: This is also how the device uploads new Fingerprint Templates (Command 'E').
{
  "cmd": "E",              // The command being replied to
  "ack": "S",              // "S" = Success, "F" = Failed
  "mac": "AA:BB:CC:...",   // Device MAC Address
  "cid": "cmd_839201",     // The Original Tracking ID
  "battery": 95,           // Current Battery Level (%)
  "parameter": "12,255,0..." // 512-Byte Raw Fingerprint Template
}| Field | Type | Description |
|---|---|---|
| ack | Char | 'S' for Success, 'F' for Failure. |
| parameter | String | Contains response data (e.g., 512-byte template for 'E', JSON settings for 'P', RFID string for 'R', or a status message). |
| cid | String | Used to mark the command as 'Completed' in your DB. |
Attendance Data
POST /attendanceThe device pushes attendance logs here. The payload differs based on the configured mode.
Scenario A: Live Mode (Real-time)
{
  "mode": "live",
  "mac": "AA:BB:CC:...",
  "scanTime": "2026-01-04 10:05:22",
  "type": "F",          // 'F' = Fingerprint, 'C' = RFID Card
  "id": "101",          // User ID
  "confidence": 85      // 0-100 Match Score
}
Scenario B: Lecture Mode (Batch)
{
  "mode": "lecture",
  "mac": "AA:BB:CC:...",
  "startDateTime": "2026-01-04 10:00:00",
  "endDateTime": "2026-01-04 10:45:00",
  "teacher": {
    "type": "F",
    "id": "1",
    "confidence": 98
  },
  "students": [
    { "type": "F", "id": "101", "confidence": 85, "scanTime": "..." },
    { "type": "C", "id": "A1B2C3", "confidence": 0, "scanTime": "..." }
  ]
}
Batch Sync
GET /syncUsed to download fingerprint templates from Server to Device. Uses Pagination to handle memory limits.
Logic: The device requests page=1. You return data + has_more: true. The device keeps asking until has_more: false.
{
  "has_more": true,         // Set to false ONLY on the last page
  "mac": "AA:BB:CC:...",
  "templates": [
    {
      "id": 101,            // Slot ID (1-1000)
      "data": "12,255,0..." // 512-byte comma separated string
    },
    { "id": 102, "data": "..." }
  ]
}
Command Reference
| Code | Action | Description | Parameter |
|---|---|---|---|
| C | Connect | Device leaves attendance mode; enters “Command Mode” | None |
| D | Disconnect | Device leaves command mode; enters “Attendance Mode” | None or "O0" (Sets Startup to Attendance) |
| E | Enroll | Scans a new finger and uploads it to /acknowledge | "0" |
| X | Delete ID | Deletes a specific Student ID from device memory | "[ID]" |
| - | Delete Range | Deletes a range of IDs (e.g., 100 to 200) | "[Start]*[End]" |
| % | Empty DB | WARNING: Deletes ALL users and templates | None |
| S | Sync Batch | Triggers the Batch Download process (/sync). | None or "%" (Erase DB before sync) |
| W | Write One | Writes a single template to the device | "[ID]*[DATA]" |
| N | Set Network | Updates WiFi Credentials (WPA2 Personal/Enterprise) | "[SSID]*[PASS]" or "[SSID]*[PASS]*[IDENTITY]" |
| A | Set API | Updates Server Base URL and API Key | "[URL]*[KEY]" |
| M | Set Confidence | Sets matching strictness (Default: 50) | "25" to "100" |
| B | Set Beep | Enables/Disables beep sound on scan | "1" or "0" |
| L | Set Live Mode | Toggles instant upload vs batch upload | "1" or "0" |
| O | Set Startup Mode | Configures the device's default operational mode on power-up. | "0" for Attendance, "1" for Command |
| T | Set Map Template Mode | Configures the device to map given templates with custom ID instead of slot ID. | "0" for slot ID, "1" for custom ID |
| ! | Factory Reset | Resets ALL settings and Data | None |
| R | Read RFID | Returns RFID value of currently shown Card | None |
| V | Version | Returns firmware version | None |
| $ | Set Device Mode | Toggles between Bluetooth (App) and WiFi API Mode | "1" (BT) or "0" (WiFi) |
| P | Get Preferences | Requests all internal device settings. Device replies with a complete JSON payload in the /acknowledge parameter. | None |
| U | OTA Update | Triggers Over-The-Air firmware download | None |
TAMS ERP Test Kit - Deployment Guide
Overview
The TAMS ERP Test Kit is a lightweight, file-based PHP implementation of the TAMS Server API. It requires NO database setup (uses text files for storage) and works on any standard PHP hosting environment. This allows you to test device connectivity instantly without setting up MySQL or complex backends.
1 Unzip & Upload
Unzip the tams_test.rar file to your web server's root directory (e.g., /var/www/html/tams_test/ or htdocs/tams_test/).
2 Set Permissions (Critical)
The test kit uses text files as a database. You must grant Write Permissions (CHMOD 777) to the following files and folders:
- /templates (Folder)
- device_logs.txt
- attendance_data.txt
- commands.json
3 Configuration
Open auth.php in a text editor and set your desired credentials:
$API_KEY- The secret key used by the device (Header: X-Api-Key).$dashboard_password- The password to access the web dashboard (index.php).
File Structure Explained
| Filename | Description |
|---|---|
| index.php | The Admin Web Dashboard (view logs/commands). |
| auth.php | Configuration file for API Key & Password. |
| toTAMS_command.php | Endpoint for GET /command (Polling). |
| fromTAMS_acknowledge.php | Endpoint for POST /acknowledge. |
| fromTAMS_attendance.php | Endpoint for POST /attendance. |
| toTAMS_sync.php | Endpoint for GET /sync. |
| /templates | Folder where fingerprint data files are stored. |
Postman Testing Guide
You can simulate the ERP server using Postman's "Mock Server" feature to test the device connectivity immediately without deploying code.
Step 1: Create Collection
Create a new Collection named "TAMS Device Simulation".
Step 2: Add Mock Endpoints
Add the following examples to your collection:
- GET /command Response: {"status":"none"}
- POST /attendance Response: {"status":"success"}
Step 3: Create Mock Server
Click "Mock Servers" -> "Create Mock Server". Select your collection. Copy the generated Mock URL (e.g., https://...mock.pstmn.io).
Step 4: Run Test
Enter the Mock URL into the TAMS App (Server Config). Watch the Postman "Logs" tab to see the device polling every 15 seconds.
Ready to start coding?
We have prepared a complete PHP Reference Kit that contains working code for all the endpoints above. We also offer a Postman collection for mocking the server.